

Articles
Learn more about how our products and services help customers just like you on a daily basis.
Learn more about how our products and services help customers just like you on a daily basis.
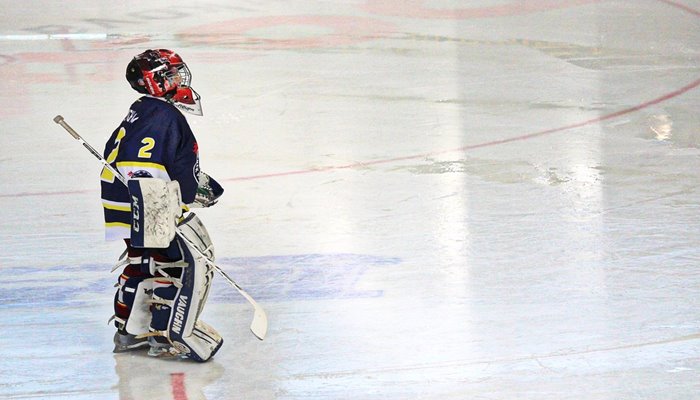
Indoor ice rinks are used for some of the best sporting and recreational activities - ice hockey, curling, figure skating, speed skating. The slightest variation in the quality of the ice could be the difference between a gold medal performance, or a scraped knee.
If you’ve ever been on an ice rink you might wonder how it works. Unless you’re outside on a frozen-over pond you might not know what is beneath you.
The technology used in artificially frozen ice rinks is actually very familiar. It’s the same mechanical technology used in refrigerators and air conditioners that impact our day to day lives - It’s just refrigeration, but on a much larger scale!
Unless you happen to be living in a very cold country with lakes or ponds that freeze over you are going to have to find another alternative to creating an ice rink - this is the process of creating an artificial mechanically frozen rink.
The benefits? Well, not falling through the ice into freezing water is one. But the other is having a year-round efficiently refrigerated rink that can be used come rain or shine.
But how is it made?
An ice rink has the following layers and elements:
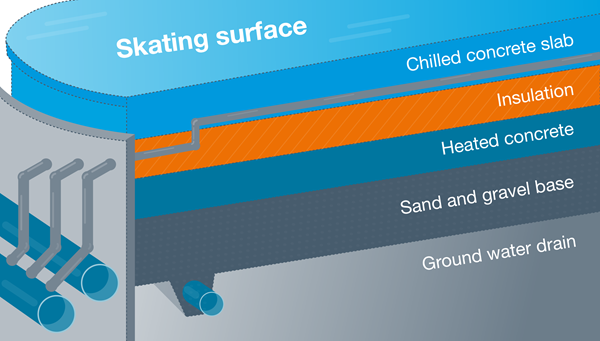
To create the skating surface the ice is built in layers. Water is carefully sprayed directly onto the concrete slab at around 1/32 of an inch thick. This layer freezes almost immediately when it hits the concrete and forms the base of the ice rinks skating surface.
After the first layer, more super-thin layers are applied and allowed to freeze. Within the first few layers, a layer will be painted white to contrast the black puck. The lines and logos required for ice hockey games are also painted on at this stage. The entire process of spraying water, painting, and freezing can take up to four days.
It takes between 45,000 to 57,000 litres of water to form a hockey rink surface - and the surface is normally only between ¾ inch and 1 ½ inch thick. If the ice is too thick it will require more energy to freeze and the top may remain too soft. If it is too thin the skaters could cut through the ice to the concrete.
The surface ice is kept at the required temperature by using a refrigeration system pumped through pipes embedded in the concrete slab below the skating surface. The ideal temperature of the rink surface is around -4C for ice hockey. Note there will be other factors affecting the ice temperature including the building temperature, outdoor temperature, and humidity.
Underneath there is a layer of insulation and a heated concrete layer. This keeps the ground below the ice from freezing, which could expand and ultimately crack the rink structure.
The entire rink then sits on a base layer of sand or gravel which has a groundwater drain at the bottom.
The most common method of refrigeration used in keeping an ice rink frozen is an indirect refrigeration system.
This is where a liquid refrigerant (often ammonia) absorbs heat from a secondary liquid (often brine) which has absorbed heat from the source. Therefore it is indirect as the refrigerant does not directly come in contact with the source of heat transfer.
Why Brine? Brinewater is a calcium-chloride solution that is actually used as an anti-freeze agent. Brine freezes at a lower temperature than the water on the surface and therefore can remain as a liquid as it flows through the pipes, but is still cold enough to be able to freeze the water poured on the surface.
There are three main components used in the heat exchange of this indirect refrigeration cycle:
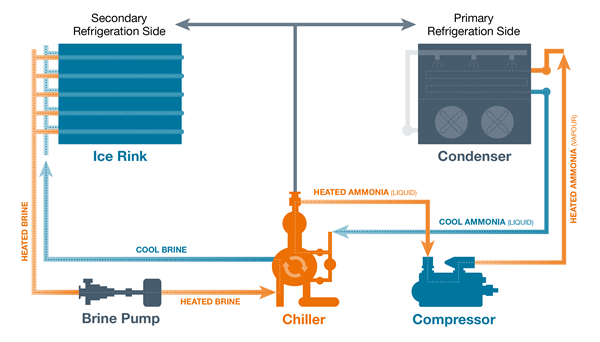
The chiller is where the brine returns with heat from the ice rink surface to be absorbed by the much colder liquid refrigerant (ammonia). The ammonia will then boil and vaporise as it absorbs the brines heat. The cooled brine then re-circles to the rink.
The compressor pulls the vaporised ammonia from the chiller, in turn lowering the pressure in the chiller. The compressor pressurises the ammonia gas which raises its temperature from around -12°C to over 100°C. As the ammonia gas reaches the condenser it begins to condense and is further cooled and returned to a liquid form. Where it is then circulated back to the chiller to absorb the returning brines heat - completing the refrigeration cycle.
But how does this keep the rink cool? While the refrigeration cycle is taking place in the primary refrigeration site, the recently chilled brine is being pumped from the chiller into the pipes that are embedded in the rink floor. These pipes circulate the entire floor and as the brine passes through it draws the heat from the ice surface keeping it at the required temperature of around -4C. Remember heat always moves from hot to cold, and as the brine is colder than the surface it removes the heat. The brine then returns to the chiller several degrees warmer and releases the heat it has absorbed from the rink surface, back to the ammonia refrigerant. Where the process starts again.
Want to find out more about what compressors we supply at Howden to suit your industrial refrigeration needs?
 Request A Quote
 Email An Inquiry
 Find Our Locations
 Join Our Team